Posts

Showing posts from May, 2017

Year 7

Image
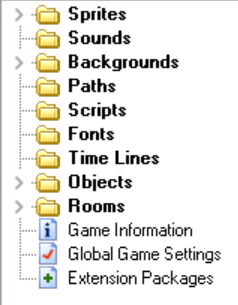
Learning Objective: Understand what a game making object is and how to program these using GameMaker Starter: Open up GameMaker and your game. What do you think each part of the left panel is? What do they do? Discuss! Main: Task 1 1. Ensure you have created sprites for your characters. 2. Ensure you have added objects for every Sprite...How? Experts? 3. Ensure you have created a room and background for your game Task 2 1. Create a new sprite that is solid in colour and create an object for this...This will be your wall! What box do we need to tick for this do you think? 2. Add your objects to your room...Build your wall!  Task 3 How do we program our objects? 1. Program your player to move using the worksheets 2. How can you test your programming works? 3. Experts? Extension: 1. Can you program your enemy? What do you want it to do? 2. Can you program your character to pick up your collectable? 3. Can you program your character to die when he touches the e

Year 8

Learning Objective: Understand how to link pages in DreamWeaver and add appropriate content to your website design. Starter: What does Copyright mean? Main: Task 1 1. Open up your website Template and 4 pages in DreamWeaver. Is there any experts to help each other? 2. Add text to your Dreamweaver PAGES (not template...why?) Task 2 1. Find images online that will suit your website 2. Save the images in your Dream Weaver folder. Why must we do this? 3. Insert the images to your pages...how? Can you help others? Task 3 How do we link pages? 1. Ensure you have 4 pages and template saved in the correct place 2. Link your pages...can you help others? How would you test your pages link? Extension: 1. How might you add videos? 2. What other tools could you use to make your website functional?  3. Use YouTube and other resources to help you try new tools! Plenary: Discuss with a partner what part of today's lesson you found difficult? Why do you think that is?

10N2

Image
Learning Objective: Develop a test plan for your program Starter: What do you think a test plan will be? What will we test? How would you create a test plan for a cup of tea algorithm? Main: Task 1 What do you think  Extreme, Valid and Erroneous data might be? Work through the example in Task 2 Create a test plan table with the data you will use for your program in your  Evidence document. Use the worksheets to help you. Task 3 Write a testing strategy using the worksheets provided. Insert the flowchart into your Evidence document. Plenary: Update the Tracker  HERE

9M4/9P2

Learning Objective: Program your main character to move independently using various resources Starter: Open your development logs and Cida Tracker in  classroom.google.com Ensure these are up to date! Main: Task 1 Pick up any expert cards you think you can help other with. Task 2 Using the Tracker and tutorials, develop your character/levels and other parts to develop your game Task 3 What aspects have you completed this lesson? What will you do next lesson? Plenary: Update the Tracker with comments Update your development logs - remember the feedback!

10N2

Learning Objective: Develop flowcharts and an IPSO table for Tasks 3-6 Starter: Compare Task 2 and 3 decomposition Use the worksheets provided to help you Update your Evidence document. Main: Task 1 Use this decomposition to build the IPSO table for Task 3.  Use the Task 2 IPSO to help you - what is different? Update your Evidence document Task 2 Use the decomposition of Task 4, 5 and 6 to complete the IPSO tables for these. Task 3 Use the IPSO tables to create flowcharts for all tasks.  Go to  Draw.io  to create the flowchart. Insert the flowchart into your Evidence document. Plenary: Update the Tracker  HERE

9P1/9M3

Learning Objective: Consolidate and present your learning of ECDL using appropriate tools in Microsoft. Starter: Reflection - What have you learnt about so far? What has been easy? Difficult? Dragon's Den Dragon's Den 2 Main: Go to classroom.google.com Read through the tasks that you can complete. You may work alone or in groups of 2-4. You will present your chosen task to the group in a later lesson. Plenary: What Task have you chosen? Why? What do you need to do over the next few lessons?

9M4/9P2

Learning Objective:  Understand how to develop objects in Game Maker Starter: Open your development logs and Cida Tracker in classroom.google.com Respond to the feedback I have given you on the Tracker. Improve your development logs Pick up any Expert Cards that are relevant to you - Independent learning!  Main: Task 1 Create an object for your platforms/floor to allow your character to land/stay on there. How might you do this? What settings might you have in your object? Ensure all relevant platforms are covered with this object in your rooms Task 2 Insert your characters into your game as Sprites and create objects for them. Are there any experts for this? Task 3 Program your characters/enemies/collectibles independently.  Use the resources in classroom.google.com Are there any experts you can ask to help? Plenary: Update the Tracker with comments Update your development logs - remember the feedback!

10n2

Image
Learning Objective: Develop flowcharts and an IPSO table for Tasks 1-3 Starter: Your evidence should be looking something like this: Use the worksheets to ensure you have completed the IPSO/Flowchart for Task 1 Main: Task 1 Decompose Task 2 -  The program must allow the user to access the temperature for different locations and time periods Use the worksheet provided to help you Update your Evidence document. Task 2 Use this decomposition to build the IPSO table for Task 2. Use the worksheet provided to help you. Update your Evidence document. Task 3 Use the IPSO table to create the flowchart for Task 2.  Go to Draw.io to create the flowchart. Insert the flowchart in to your Evidence document. Extension: 1. Complete the decomposition for Task 3 using your task 2 statements to help. 2. Create an IPSO table for Task 3 3. Create a flowchart for Task 3 4. Continue this for the other tasks Plenary: Update the Tracker  HERE Plenary: Complete WAD re

Year 7

Learning Objective: Develop a background design for your game Starter: Word search Main: Task 1 How might you create a room? Are there any experts?  Task 2 1. Go to classroom.google.com 2. Create a background using the template 3. Download the template using the prompt sheet Task 3 How do you think you will insert your background in to your game? Extension: 1. What is an object? 2. What do objects do? 3. Create objects for all your sprites. Plenary: What do you think you could be an expert at?

9M4/9P2

Image
Learning Objective: Develop platform designs using tile sets in Game Maker Starter: Expert Cards?! Update the Cida Tracker Main: What are tile sets? Why do we use them in Game Maker? Task 1 Complete your tile set designs in  classroom.google.com . Download your designs in to your Game folder (see Prompt sheet in Google classroom to help you)  10mins Task 2 Complete your platform designs in your game: 1. Insert your tiles as a background but make sure you click the 'tile set' box: 2. Design your platforms/walls etc with your tiles. 10mins Task 3 Design your platforms for each level. Top Tips: - Ensure your level 1 is easy - Ensure each level gets progressively harder - Remember you can change this as your continue to develop your game! Extension: Insert your characters as sprites Plenary: Update your Tracker with comments/development logs

9P2 - Cover. Click Me

Image
Learning Objective: Complete your tile set designs.  Complete your platform designs. Starter: 1. Ensure you have updated your development logs (classroom.google.com) 2. All screens should be complete 3. All backgrounds and rooms should have been created 4. All buttons should have been created 5. Ensure the Cida Tracker is up to date (both tabs) Main: Task 1 Complete your tile set designs in  classroom.google.com . Download your designs in to the Game folder Tips: 1. Remember they are very small so don't spend ages on the design 2. You do not have to use all of the tile designs 3. You can add more tile designs by copying the google drawing 4. When downloading the images, download as a .png 5. You can change these later if need be (very easily) Task 2 Complete your platform designs in your game: 1. Insert your tiles as a background but make sure you click the 'tile set' box (name them appropriately): Task 3 Design your platforms/walls etc with your

10N2

Image
Learning Objective: Understand how to decompose the problem into tasks. Understand how to design a solution to each subtask. Starter: What are your requirements? Do they match these? Have you covered all the requirements? Task - Update your requirements. Main: Task 1 Decompose the first subtask Update your evidence document Task 2 Use your subtask decomposition to create an IPSO table (Input, Process, Storage, Output) Update your Evidence document. Ensure you have inserted your flowchart for task 1 too. Your evidence should be looking something like this: Task 3 Decompose Task 2 -  The program must allow the user to access the temperature for different locations and time periods Update your Evidence document. Use this decomposition to build the IPSO table for Task 2 Use the worksheet provided to help you Plenary: Update your Evidence document. Update the Tracker HERE

10N2

Image
Learning Objective: Complete your main program flowchart. Understand how to complete the IPSO table for each subtask. Develop an algorithm for each subtask. Starter: Homework Finish your flowchart in  draw.io  for your main program. Main: Task 1 Complete the IPSO table for your main program using the flowchart you created for the main program. This is located in the 'Design' section of your evidence document. Task 2 Add to your IPSO table for each subtasks: A - Display all data B - Display data for selected date, location and time C - Display weather data for selected day and time D - Display weather data for selected location and time E - Display weekly minimum and maximum temperatures and wind speeds Q - Quit the program Task 3 Create a flowchart  in  draw.io  for each subtask. Hint: Remember you may have subroutines within your subtasks     Plenary: Update the Tracker with a comment HERE or on classroom.google.com

YEAR 8

Image
Learning Objective: Understand how to change the appearance of your website template. Create pages for your website. Starter: Finish your banner in classroom.google.com Download your banner and save it in your Dreamweaver folder. Main: Task 1 1. Open your Template from last lesson.  2. Insert your banner to the top bar. How might you do that? 3. Ensure you have editable regions in the text Task 2 1. Change the width to 100% 2. Change the colours of your template Use the worksheet provided to help you. Task 3 Create new pages for your website (Remember this is just the Template!) 1. Rename the links on the side to 4 pages you want in your website. 2. Click New, Page from Template and select your template. 3. Change the title of the page and save the page as your title (Use the links you created) Now you can add some text and images to build your website on each page! Plenary: Show different members of the class your website so far, do they have any fee

9P2/PM4

Image
Learning Objective: Complete all buttons for your screen. Use objects to create platforms for your game. Understand what a tile set is for a game and develop your own tile set for your game. Starter: Development Logs recap: How many are there? What are they used for? When should you be updating them? Main: Task 1 Complete buttons for the following: 1. Start Button (goes to Level 1) 2. Backstory Button (goes to Backstory Screen) 3. Instructions Button (goes to Instructions Screen) 4. Back Button (goes back to the main menu) 5. Exit Button (Quits the game) Task 2 1. Go to classroom.google.com 2. Go to the assignment 'Create your own tile set' What is a tile set?! 3. Design your own tile set from the templates. 4. Download your tile set to the appropriate folder. Task 3 1. Insert your tiles as a background but make sure you click the 'tile set' box: 2. Design your platforms/walls etc with your tiles. 3. Do this for every level Extension

Year 7

Image
Learning Objective: Complete designs for your game. Understand how to create and input Sprites using Game Maker Starter: Main: Task 1 Complete designs of the following: - Main Character  - Enemy - Collectable item You can use pixel art or find an image from the internet. What application would you use to edit an image from the internet? How might you get rid of a background of an image? Task 2 Open Game Maker Save your game with an appropriate name in your game making Folder. Task 3 Insert your sprites into your game. Ensure you name them appropriately...why might you think we do this? Save your game Extension: 1. Look around Game Maker, how could you find out how to create a room? What are objects? Why might you add a background to your game? How can you get help? 2. Create a room  Plenary: Show a partner your game sprites. Have they been inserted correctly? Are the names appropriate? Has the game been saved in the correct place? What have you lea

10n2

Image
Learning Objective:  Refine and complete the Analysis stage of the NEA. Understand how to develop an algorithm to design your solution to the NEA problem Create an IPSO table to help develop the algorithm Starter: Homework? Drones! You have 15 minutes to improve your analysis work from my comments. I will be marking this as completed by the end of the week.  To view the marking scheme go to the NEA class in classroom.google.com and then to the 'About' Section Main: Task 1 Finish your flowchart in draw.io for your main program. Use these examples to help you: Task 2 Complete the IPSO table on your worksheet: What were your results for these everyday activities?  Task 3 1. Complete the IPSO table for your main program using the flowchart you created at the start. This is located in the 'Design' section of your evidence document. 2. Create an IPSO table for each of your subtasks.  Extension: Complete a flowchart for each of your sub

9M4/9P2

Image
Learning Objective: Understand how you will test your game and evidence this. Create buttons on all your screens to navigate your game correctly. Starter: Development logs! Go to classroom.google.com Open and start testing! Main: Create buttons for your game ( 1:50) :  YOUTUBE LINK HERE   Extension: If your complete all your buttons see me to share the following: Create tiles for your game using the templates in classroom.google.com These will be what your platforms can look like...   Plenary: Update your development logs